In the last couple of years, I have grown fond of StandardJS, an opinionated JavaScript code style standard that aims to become the de-facto standard for every JavaScript developer.
Since I discovered StandardJS I have basically started using it in all my projects.
In this article, I want to illustrate how easy it is to start a new project and configure your environment to use ESLint and StandardJS.
Let's create a new project
The easiest way to create a new project is to create a new folder called my-new-project and then, open a shell inside that folder and run:
npm init
... and then follow the guided prompt.
If you want to go with something quite standard and skip all the questions you can simply do:
npm init -y
Note the -y flag, which effectively means "use the default options and don't ask me anything".
At this point, you should see a package.json file in your project and it should contain something like this:
{
  "name": "my-new-project",
  "version": "1.0.0",
  "description": "",
  "main": "index.js",
  "scripts": {
    "test": "echo \"Error: no test specified\" && exit 1"
  },
  "keywords": [],
  "author": "",
  "license": "ISC"
}
Install and initialize ESlint
ESLint is a JavaScript linter that can help you to find and fix problems in your JavaScript code. It can also help you to make sure that your coding style is consistent in every file. You can use predefined styling rules including the one proposed by StandardJS.
The easiest way to install ESLint is through the following command:
npx eslint --init
You should see a guided process like the following:

This is how I am answering the questions from the guided installer:
- How would you like to use ESLint? - To check syntax, find problems, and enforce code style
- What type of modules does your project use? - JavaScript modules (import/export)
- Which framework does your project use? - I picked None of these, but that's up to you and your current project needs :)
- Does your project use TypeScript? - I picked No, but if you prefer to use TypeScript, the rest of the tutorial shouldn't change much
- Where does your code run? - I selected Node only, but, if you are writing code that runs also on the browser, check that one as well.
- How would you like to define a style for your project? - Use a popular style guide and then select Standard
- What format do you want your config file to be in? - JavaScript
- Would you like to install them now with npm? - Yes
When the installer has finished, you should have a new file called .eslint.js in your project and it should contain something like this:
module.exports = {
  env: {
    es2021: true,
    node: true
  },
  extends: [
    'standard'
  ],
  parserOptions: {
    ecmaVersion: 12,
    sourceType: 'module'
  },
  rules: {
  }
}
Note: if you are like me and you want to use JavaScript modules (ESM) in your Node.js project, remember to add the configuration "type":"module" in your package.json and to rename .eslint.js to .eslint.cjs.
If you open your package.json you can also see that there are some new development dependencies installed in your project:
{
  "devDependencies": {
    "eslint": "^7.18.0",
    "eslint-config-standard": "^16.0.2",
    "eslint-plugin-import": "^2.22.1",
    "eslint-plugin-node": "^11.1.0",
    "eslint-plugin-promise": "^4.2.1"
  }
}
Validate and format your code in VSCode
The easiest way to validate your code using your local ESLint configuration is to use the Visual Studio Code ESLint extension.
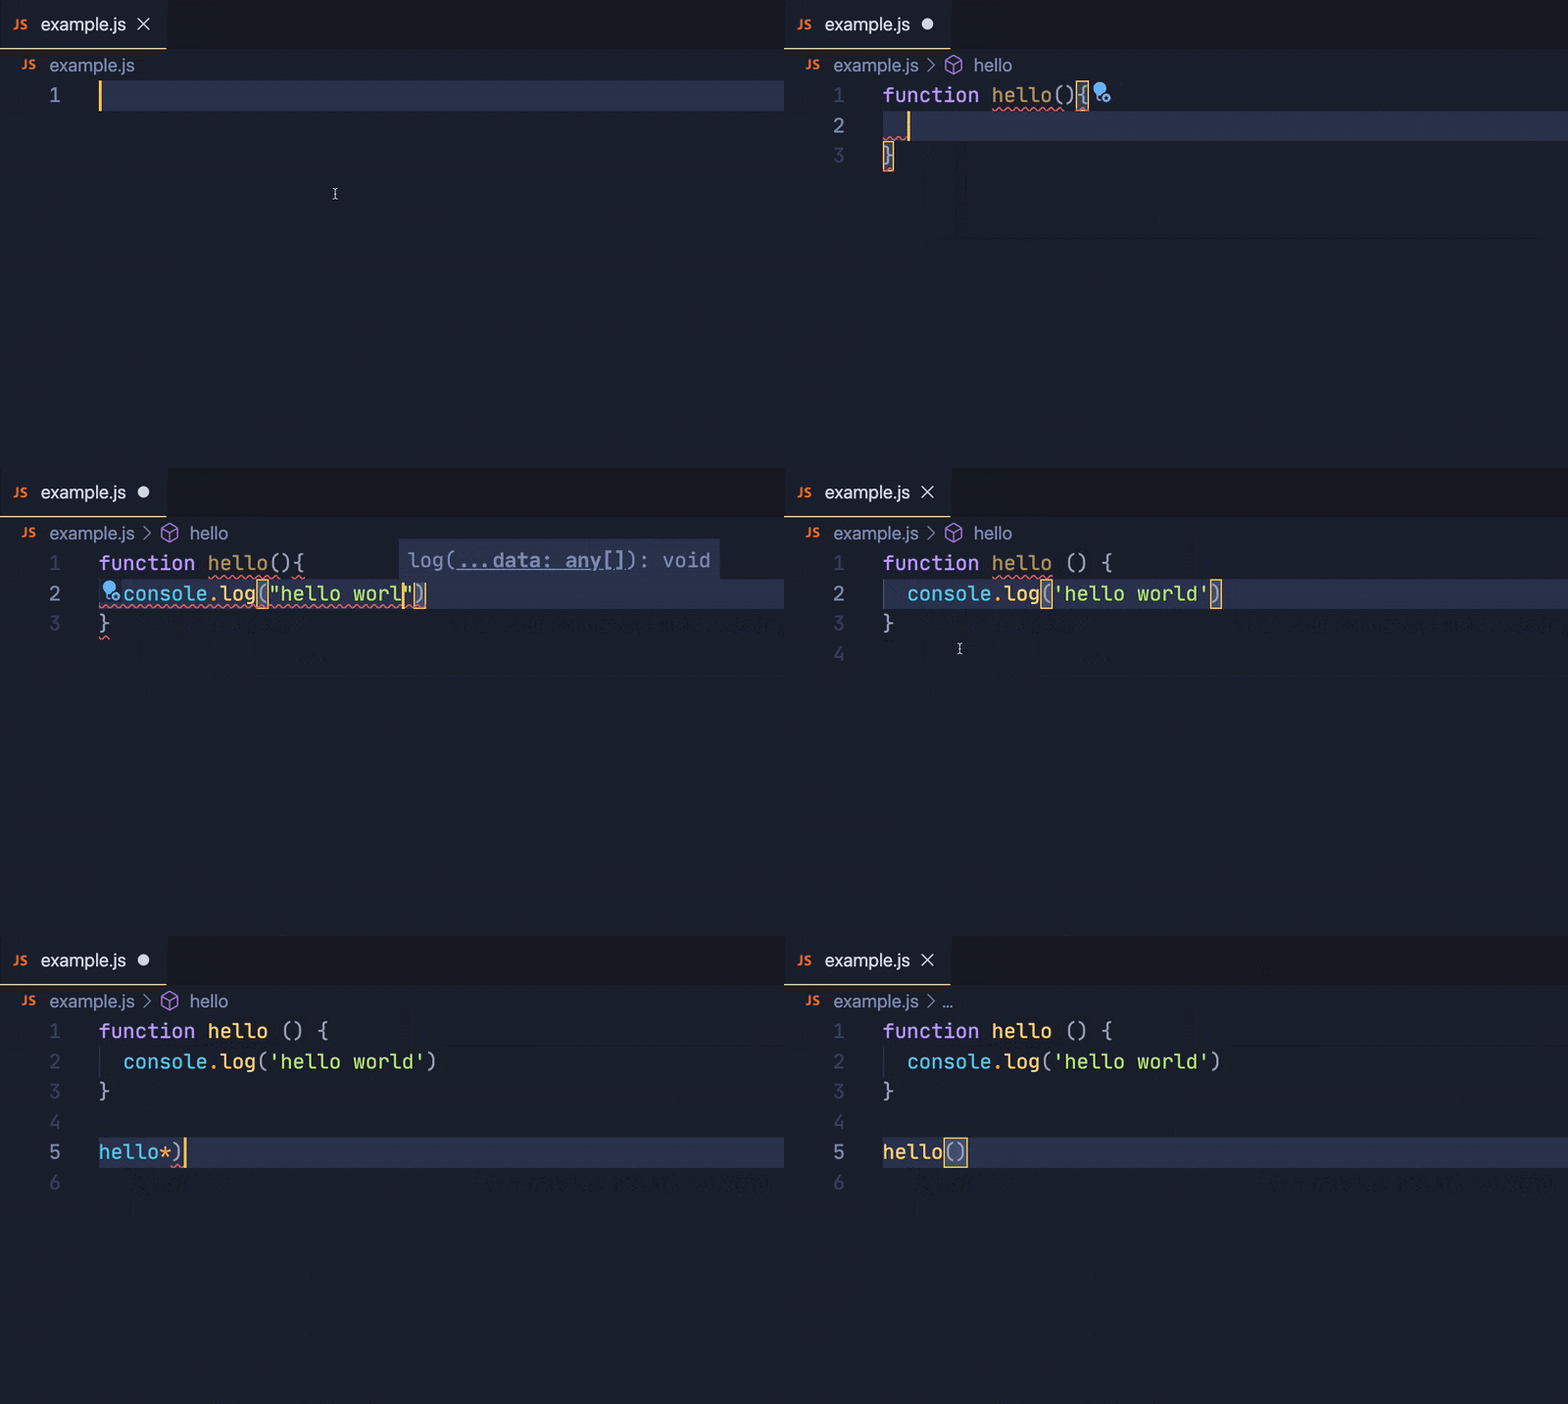
Once you have this extension installed and enabled you can get inline red squiggles when something is wrong with your code style and you can even enable the feature "auto-format on save".

You can see on the screen recording above, how on saving the code ESLint fixes all the space inconsistencies and it even removes unnecessary semicolons... Crazy stuff! 😱
How to check and auto-fix code style from the command-line
Of course, it is possible to validate code style and automatically fix it from the command line as well.
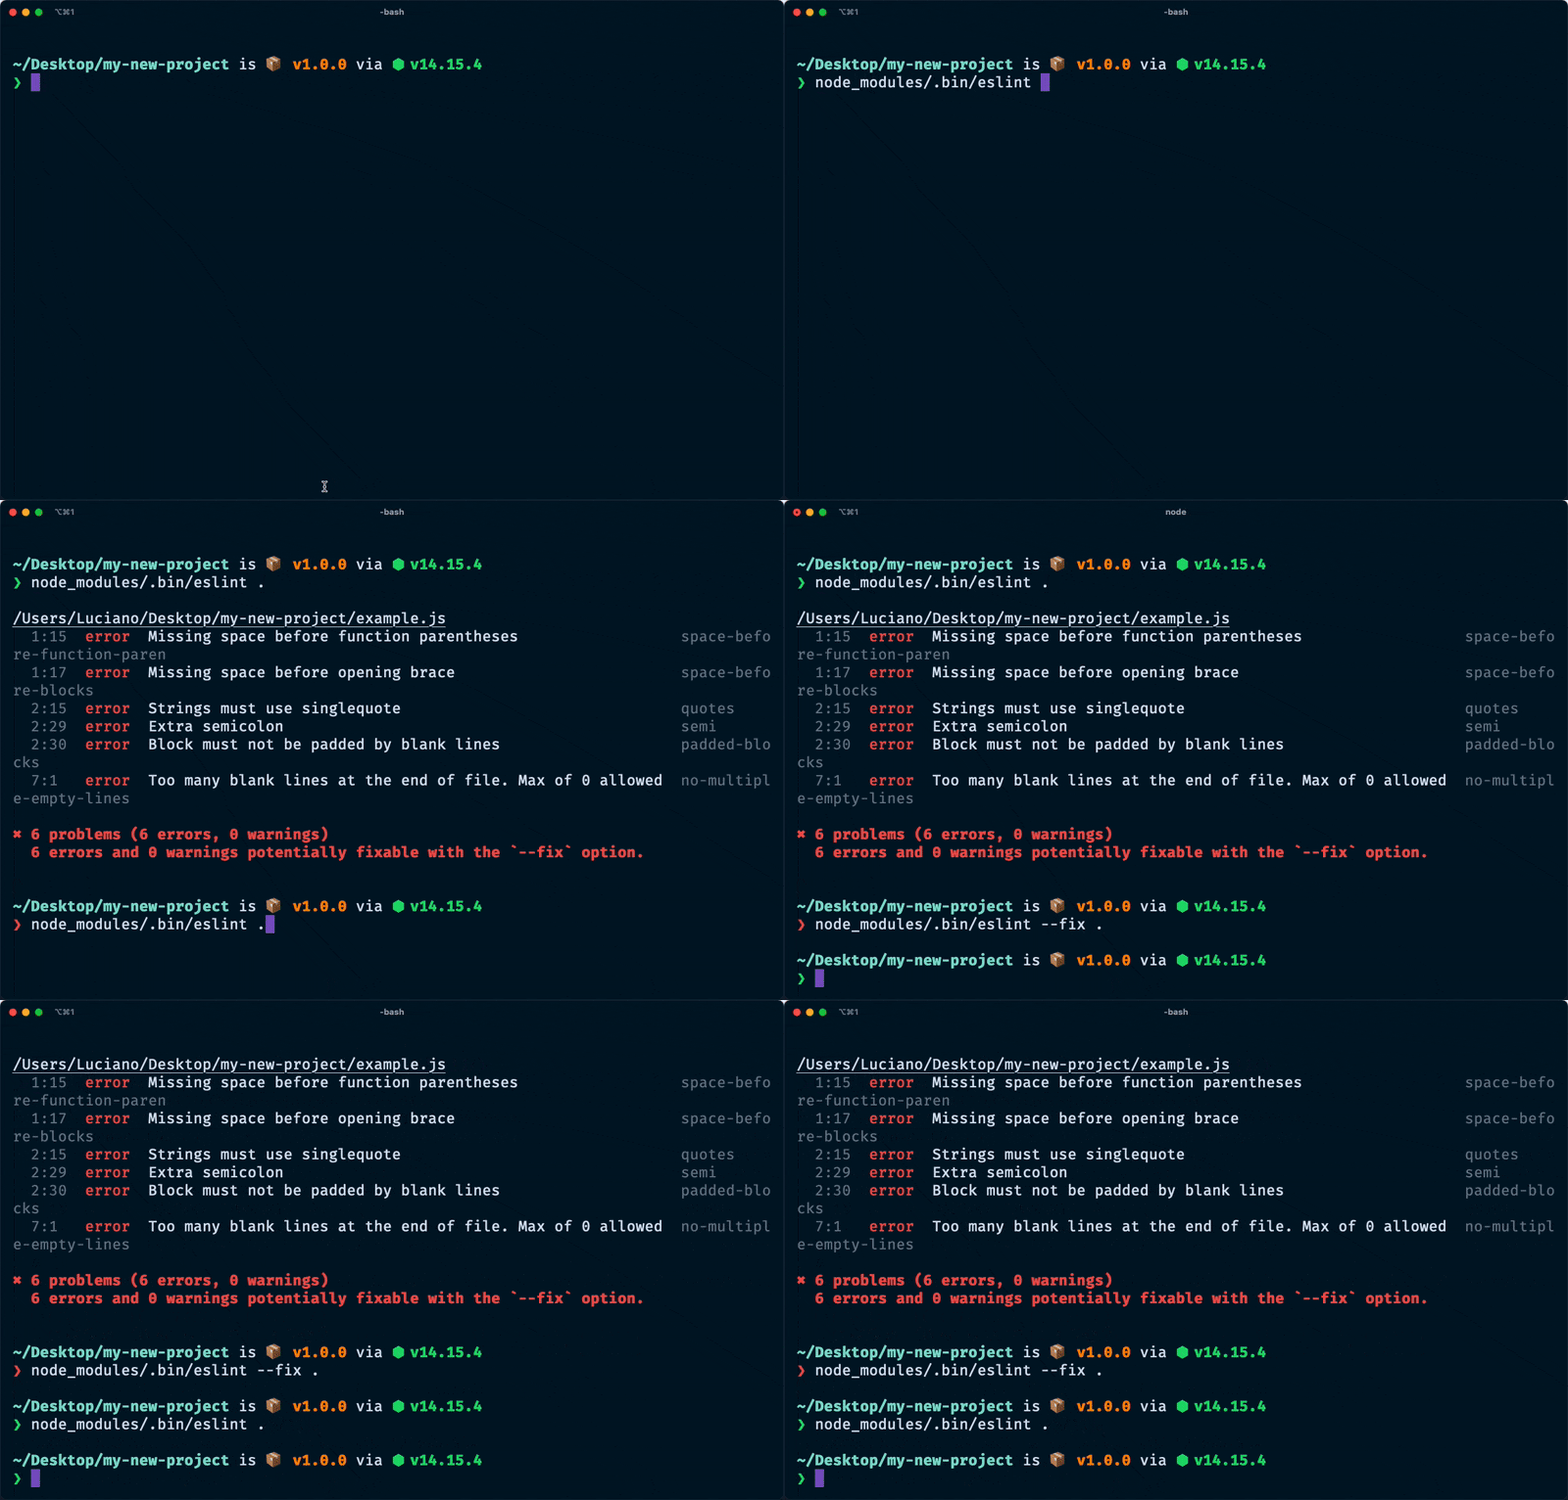
Here's how we can check our code for invalid style using the ESLint command-line utility:
node_modules/.bin/eslint .
If we have style errors, this command will show something like this:
.../my-new-project/example.js
  1:15  error  Missing space before function parentheses                  space-before-function-paren
  1:17  error  Missing space before opening brace                         space-before-blocks
  2:15  error  Strings must use singlequote                               quotes
  2:29  error  Extra semicolon                                            semi
  2:30  error  Block must not be padded by blank lines                    padded-blocks
  7:1   error  Too many blank lines at the end of file. Max of 0 allowed  no-multiple-empty-lines

✖ 6 problems (6 errors, 0 warnings)
  6 errors and 0 warnings potentially fixable with the `--fix` option.
As you can see at the bottom, ESLint is suggesting us to try the --fix flag to automatically fix these issues. We can do that as follows:
node_modules/.bin/eslint --fix .
If this command exits successfully without printing in the standard output, then all the errors have been fixed.
You can try to run again the validation command and it should not report any error.

Use ESLint from npm scripts
OK, that ./node_modules/.bin/eslint thing is annoying. Definitely tedious to remember. Can we just say eslint?
Well, yes and no...
We installed ESLint as a project dependency and not as a global dependency in our system.
This means that any executable provided by ESLint will be copied in the project folder for executables, which is ./node_modules/.bin/.
You could install ESLint globally by doing something like:
npm i -g eslint
But, I would not recommend this approach. In fact, most likely you will end up using different versions and configurations of ESLint in different projects. If you end up using a global install of ESLint, chances are that the global install of ESLint won't match the version used in your specific project and that might lead to errors or unexpected behaviours.
So, my advice is to keep installing ESLint as a project dependency and always use the executable present in your project.
But having to do ./node_modules/.bin/eslint is still annoying! Yeah, 100%!
To make our life a little bit easier, we can set up some npm scripts to validate and fix our code style.
Open your package.json and add the following changes:
{
  "scripts": {
    "lint": "eslint .",
    "lint:fix": "eslint --fix ."
  },
}
Now you can simply run:
npm run lint: to validate the code stylenpm run lint:fix: to validate and fix it
Much easier to remember and type, isn't it?
BONUS: test on every commit with lint-staged
What if you want to test your code style before every commit?
This would be quite useful to avoid annoying failures on the CI just because you forgot to add a space somewhere!
The easiest way I know to enable ESLint validation as a git pre-commit hook is to use lint-staged. You can install it and enable it in your project by running:
npx mrm lint-staged
Now every time you are about to commit, if some of the changed files do not comply with your code standards, the commit will be interrupted and you will have a chance to fix your code style before finalizing the commit.
This is great, trust me, especially if you are working in a team and you have a nice CI/CD pipeline: you don't want it to go red just because you forgot to format some file.
It's a wrap 🌯
In this article we explored how to install ESLint in a JavaScript/Node.js project and how to use StandardJS with it.
You can use most of this guide even if you prefer some other coding standard like the Airbnb one.
I hope you found this article interesting and useful.
If you did consider connecting with me on Twitter. You can also check out my personal blog for more articles or check out my favourite side project: the book Node.js Design Patterns, I'd love to hear your feedback on it!
Thank you 🙏

